This was my first tutorial of semester B and it was with Dave McSherry. I informed him of my communication with Your Cat is a Landmine and the intention to record an EP for them for my audio project. The feedback I got was that it would be good as a project and that I needed to communicate with the band in order acquire the key information about the EP I’d be recording and possibly set up a date to meet the band. We also discussed the blog and what I would like to do as learning outcomes.
Comparison of drums from my semester A and B projects (LO1, LO2)
Throughout this semester’s audio project, two of my four main learning outcomes have been to improve the drums on music that I have recorded and mixed. I set these learning outcomes for myself because while I was satisfied with the overall capture and mix of my semester A project, I wasn’t especially content with the drum sound. I therefore wanted to focus on drums in this project to improve capturing and mixing, particularly as drums are a central part of much of the music that I enjoy recording and mixing.
I am very confident that, subjectively at very least, my drums in this project sound much better than in my previous project. With the research on recording drums which I’ve implemented from a range of different producers and artists, I’ve been able to use techniques which I feel have much improved the sound of my drums. While a small part of the improvement is due to the improved drum kit we recorded on, the key difference has been the capture and the fact that I focused heavily on drums during the mixing stage.
Objectively, the drums sound more prominent in the lower frequencies, emphasised by the kick drum, and also crisper in the high-end. The reverb is more controlled and the whole kit, as can be heard in the final mixes, cuts through the rest of the track much more successfully. Each drum is more refined, rather than blended heavily with a room mic, as was required in my semester A project, and the overheads are more withdraw in volume. Finally, the panning is more noticeable also, due to the stronger capture of each drum enabling me to pan them more naturally.
For comparison here are the isolated drum tracks (post-mix) for Lone Gazelle and 200% Gentleman, from the Your Cat is a Landmine EP.
And here are the isolated drum tracks (post-mix) for Antagonise and Fame from my semester A project.
While drum sound can be subjective I personally feel that I have bettered my own work and therefore have gone some way to achieving my first and second learning outcomes.
Mixing Process (LO2, LO3)
Today I mixed down the four tracks for this project, hopefully ready to submit. I feel like they are mixed as well as they can be and used several of the techniques that I listed in my previous post (“Mixing Drums and Vocals Checklist”).
The first thing to mention is that I am really pleased with how each track was captured and believe this shows in the mix. Every aspect of each track is a direct improvement on anything I have previously captured in other projects and I’m particularly happy about how drums sounded, even pre-mix, compared to my submission for this project in semester A. Following this blog post will be a post directly comparing the drums and vocals from this project with those of my previous one. Given that the recording and mixing of drums and vocals encompassed three of my four learning outcomes, I feel that this project has been really successful.
The first item on my mixing checklist was to simply pan the toms left and right, in accordance with Butch Vig. This is a common technique and can be seen as part of the mixer for ‘Lone Gazelle’ in the image below.
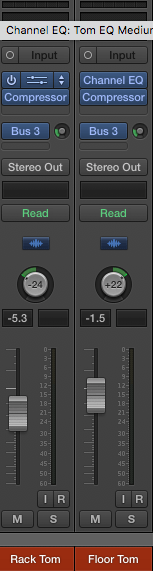
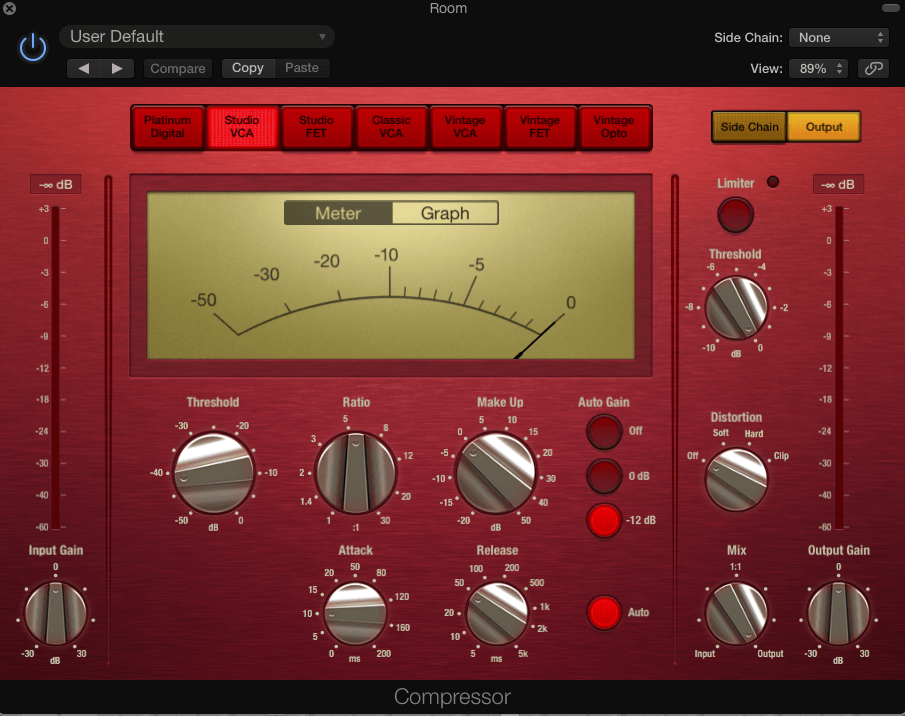
Next on the list was the heavy compression of the room mic, which I actually used in the mix a lot more than initially expected. I had thought that due to the nature of the room sound in the live room of the university multitrack that I would be using as little of the room microphone as possible but I was pleasantly surprised by how it sounded when blended with the rest of the drum mics. Through research I have identified that both Butch Vig and Chris Sheldon noted the use of heavy compression on the room mic(s) and so I replicated this through the compressor on Logic, the settings of which can be seen in the image below.
Chris Sheldon also noted the importance of compression on the kick and snare drums, which was also added. The snare, recorded in two tracks (top and bottom) was also sent through a bus to another compressor to mesh the two tracks together. The kick drum was side-chained to the bass guitar track(s) in order for the bass to lower in volume to allow the kick drum to be more dominant and avoid the two masking each other.
Butch Vig claimed that the room mics can clog up a mix, in the 300-500Hz range, but I did not encounter any issues with this, perhaps due to where I placed the room microphone. I hardly needed to use any EQ on the room mic and only lightly boosted between 5 and 10kHz in order to bring out the overheads a little more.
Vig notes that he pushes up the room mics in certain, quieter sections of tracks and this is something I replicated in each of my tracks because I think it really worked in the mix and added depth the stripped-back sound of the band. It should be easily audible in the final tracks but here is the automation for the room mic for the track ‘Lone Gazelle.’

The two aspects of mixing drums that I found through researching 1979 by the Smashing Pumpkins (part of my influences playlist) were not used. Firstly, distorting the drums was something that I tried for each track but due to the relatively clean nature of the recordings of each of the other instruments and the nature of the tracks musically, I felt it sounded out of place. Even using light distortion on the snare drum, which I regularly do, didn’t sound quite right. I also refrained from using a gate on the snare as suggested by my post on 1979. Again, musically it didn’t sound right.
For vocals, I used the Butch Vig Vocals plug-in by Waves on all three of the tracks in the EP which feature vocals, and it worked really well. It did need other plug-ins to make it sit properly in the mix but on the whole it was a success. The controls for EQ (in this case called ‘Lows’, ‘Presence’ and ‘Air’) were great for getting the most out of Ben’s voice and were also used heavily on the backing vocals. These had more ‘Air’ than the lead vocals had and much less ‘Lows’ and ‘Presence’ in order for them to be less prominent elements of each track. The plug-in also included a nice-sounding compressor that was also used throughout. The vocals were heavily compressed due to the differing intensity of Ben’s voice throughout each section of each track and this aligns with Chris Sheldon’s view on vocal compression which is part of my list of mixing techniques to use.
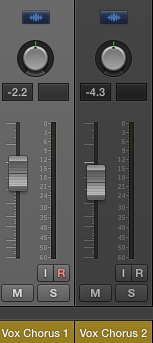
I also doubled-tracked several of the lead vocal parts, noticeably in ‘Lone Gazelle’ and ‘200% Gentleman’, which added power to vocals and also replicated the technique that Butch Vig demonstrated in ‘Drain You’ (part of my influences playlist). As in Drain You, the two vocal parts are panned centrally, rather than hard left and right, which means that you get a slight chorus effect. The channel strips for the chorus vocals in Lone Gazelle can be seen below.
The backing vocals throughout the project are double tracked as well and panned varyingly left and right to add space, as heard in 1979.
In terms of guitars and bass, I didn’t do anything particularly unusual when mixing and for the most part I found these two aspects to be the most simple. There is doubletracking of guitars right the way through the project and they are generally panned hard left and right, mostly playing the same part. The bass was recorded with both DI and an SM57 on the bass cab and I only used the DI in one of the tracks (200% Gentleman) to blend with the mic capture.
Overall I think my mixes of the tracks on the EP achieve everything I set out to and I’m happy with the final outcome.
Mixing Drums and Vocals checklist (LO2, LO3)
Here’s a list of all the key pieces of information I’ve found through research that I’ll apply when mixing the drums and vocals on this project.
Drums
- Pan toms left and right – mentioned by Butch Vig when setting a stereo space for the drums and the rest of the track, by extension.
- Heavy compression on the room microphone, as identified by both Vig and Sheldon. They also note the importance not to over-compress the rest of the kit.
- “It’s also worth compressing the kick and snare drum, but again, don’t overdo it.” – Chris Sheldon’s further thoughts on compression.
- “Hearing the room mics is important. To me, the mid-range frequencies define what the room mics sound like, though these frequencies are also what can clog up a mix, particularly in the 300Hz-500Hz range. ” – Butch Vig on how to place the room mic in a mix.
- “Sometimes I will push up the room mics in calm sections of a song, like breakdowns, and then pull them back when things get dense in the chorus” – Butch Vig on room mic automation.
- Distort the drums and make the level of distortion change in certain sections of the song as in 1979. I may choose to leave this out depending on the rest of the mix.
- Try using a gated snare, such as in 1979.
Vocals
- “You might start with slow compressor, to let the consonants ring through and follow it up with a hard brick-wall limiter at the end, to push everything.” – Chris Sheldon, on adding compression to vocals.
- Limit the dynamic range of vocals if needs be as “in full on rock songs, you don’t want a huge dynamic range on vocals, the vocal needs sit firmly in the middle of everything. So by limiting the dynamic range, you can make sure that it’s neither overbearing, nor hidden.” – Chris Sheldon on compressing vocals.
- Double tracked lead vocal parts will be both central in the mix, which is something that was done by Butch Vig on Drain You by Nirvana. This can be seen in the video at the bottom of this entry.
- The Butch Vig vocals plug-in. I’m going to try using this for vocals to replicate the classic grunge vocal sound, particularly as it seems that it would suit the nature of Ben, YCIALM’s vocalist’s voice
- Backing vocals panned hard left and right as in 1979.
- Set correct delays when using reverbs and delays in order to make the reverbs sound natural with the rest of the song. The reverb on the EP as a whole should be quite dry as is commonly found in grunge.
Reverb on Vocals (LO3)
While I’m happy with the research I’ve done on mixing vocals, which is part of my learning outcome 3, I haven’t managed to find much information on using reverb and delay on them. In the second recording session, Ben, vocalist of YCIALM, wanted delay on the vocals for one of the tracks. I hadn’t actually planned to use a great deal of reverb or delay on the EP but I think it would be beneficial for me to have researched the best way to use them.
An article on exponentialaudio.com outlines some of the key considerations when using reverb on vocals. Firstly, they claim that it’s best to record the reverb for vocals naturally. “‘Real’ reverb is around us all the time. Every space has its own sound. Wherever possible I like to record a vocal in a live space using a screen to keep the close mic dry while recording the room at the same time. If, as is more often the case, I receive a dry vocal to mix I may re-amp it into a room, hall or stairwell to give it a unique ambience.” At this stage in the project this would be difficult for me to do even if there was somewhere on the university campus that had a nice natural sounding reverb.
The article mentions that you should set the delay time on the reverb to match the tempo and timing of the track. It makes musical sense to set vocal delays to be in time with the track. However, straight delays such as quarter and eighth notes can get easily masked within the track. I usually start with an offbeat delay like three sixteenths which I find tends to naturally find the musical gaps. Then I’ll vary the delay slightly until it feels good. This is something I’ve previously done when adding reverb to all instruments in tracks.
Simon Gogerly, author of the article states that he’ll often “change the sounds and levels of effects on the lead vocal throughout a song. This can really help the dynamics of a track and keep it interesting. For instance, I may use a fairly dry sound with just a touch of plate & slap delay in a verse then introduce a longer delay and bigger reverb in the chorus.” This is also something I’ve done in the past.
https://www.exponentialaudio.com/pro-tips-source/2015/7/28/5-pro-tips-for-using-reverb-delays-on-lead-vocals